How To Snatch Part 1: Power Position Snatch
The snatch is one of the most complex lifts…
Or at least that’s how most people think about it, but the truth is it just looks complex. The key to learning this lift is breaking it down into smaller, easier-to-digest phases, and then adding on to it as you master each of the previous phases.
The first phase is the foundation of the snatch, and the building blocks for eventually mastering the full snatch—the power position snatch. In this article, I'll break down exactly how to perform the power position snatch, why it’s important, and some of the most common errors to avoid. P.S. I’ve already covered how to snatch, clean, and jerk in my FREE WL101: Beginner Guide + 6-Week Program. If you’ve never done the Olympic lifts before and want to start, I’d recommend starting there!
Understanding the Power Position Snatch
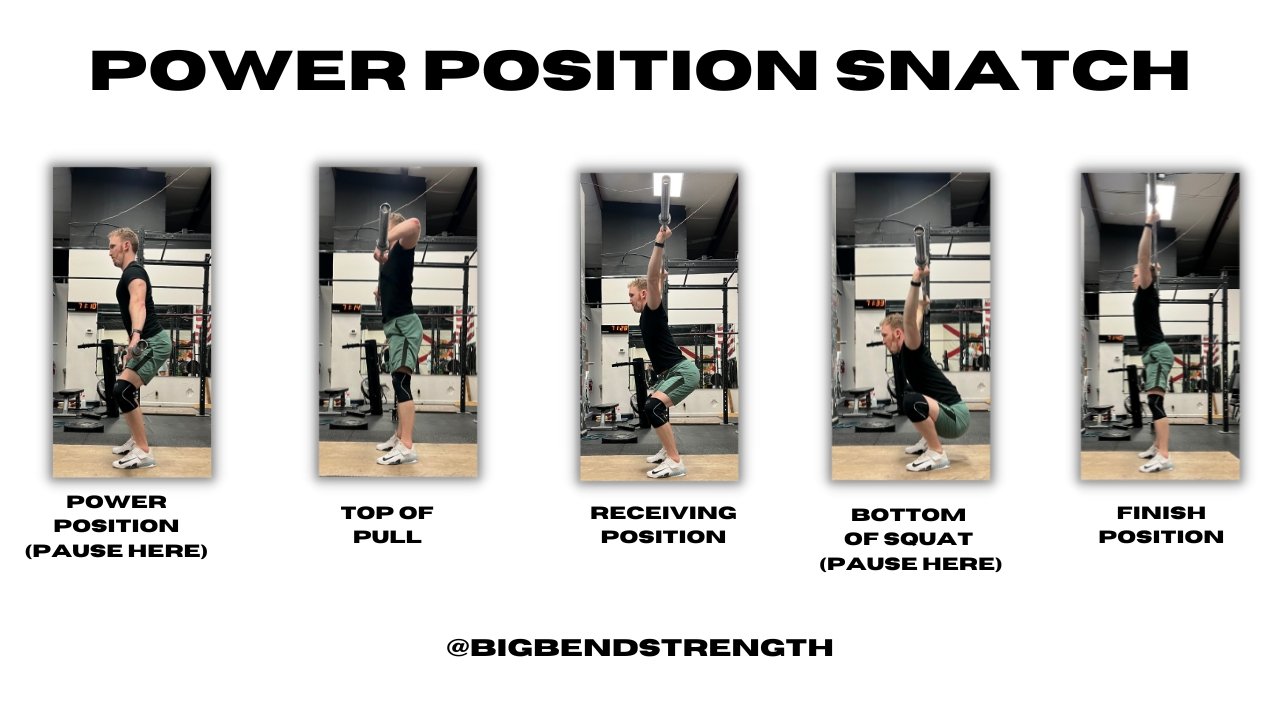
The power position snatch is the simplest version of the snatch and the most important portion of the lift to drill to perfection. The purpose of this variation is to learn two main things…
How To Create Vertical Leg Drive
How To Use The Arms To Pull Under The Bar and Keep The Bar Close
When performing a full snatch, the goal is to pull the bar from the ground to overhead in one fluid motion, but we can only get enough height on the bar by creating a ton of power from (you guessed it) the power position. This means we must always return to the power position in a full snatch, and because the lift is so fast, it can be hard to do so. If this position is not drilled repeatedly, it will not be habit and will make your full snatch far less powerful.
Set-Up
First, grab the bar in your snatch grip, move your feet to your pulling stance, and ensure you are using hook grip.
To find your snatch grip, hold that bar at your waist, then move your hands out until the bar naturally hangs in your hip crease, not upper or mid-thigh, and not hip bone height.
Your pulling stance will vary from person to person, but you will likely feel best with your feet under your hips with the toes turned out slightly. If you feel like you could do a good vertical jump from this position, then it should be perfect.
Hook grip is one of the unfortunate realities of weightlifting, but if you want to get good at the lifts, you NEED to use it. To do the hook grip correctly, extend your thumb as much as possible under the bar, then lock the rest of your fingers under the thumb. This should mean the barbell is pushing down into your thumb, and your thumb is pushing down into your fingers, effectively locking the barbell in place with a more secure grip.
Execution
Once you have your snatch grip, pulling stance, and hook grip established, stand up straight with the chest puffed out, and elbows rotated so they point up and not back.
Then, dip to your power position with bent knees, shoulders in line with the bar when viewed from the side, and midfoot pressure. Hold this position as long as needed to correct any position or balance errors, then drive up aggressively with the legs, launching the bar upwards with force. This should look and feel like a jump and NOT a hip thrust. Now that the bar is moving upward, use your arms to help keep the bar close to the body as you move straight down to catch the bar overhead with locked-out arms, and ride down if caught in a 1/4 squat until you are in the deepest possible squat. Hold this position for as long as needed to ensure stability, then stand back up with control.
A few key points here:
Your feet should leave the ground to move out to your squat stance after the legs have launched the bar upwards.
The goal is to move straight down. DEFINITELY avoid jumping forward, and avoid jumping backward, though a small amount back is not a huge deal.
You don’t need to catch in a full squat, you can catch anywhere on the way down, but ALWAYS ride it down into a full squat after you catch. Over time this will help you get under the bar faster and increase your comfort in the bottom of the squat.
A simple way to understand this lift is that the legs drive the bar up, arms move the body down. Try not to use your arms to lift the bar higher. This will always lead to a slow lift.
Common Errors and How to Avoid Them
Excessive Dip Depth: One common error is dipping too low, causing the bar to slide down the thighs excessively. This can lead to an incorrect pull when pulling from the ground, and also limits the amount of power we can generate. Keep your dip short and tight, and if it feels like it’s hard to create enough power here, it may take time for you to get stronger before it feels better!
Pushing the Bar Away with Hips: A critical mistake is pushing the bar away from the body with the hips. Any time the bar moves too far away from the body, it makes the lift significantly less efficient and much harder. Drive the bar up with the legs for maximum power AND efficiency.
Keeping The Arms Locked: Avoid keeping the elbows locked when bringing the bar overhead. This causes the bar to swing away, similar to the previous mistake. This can lead to a forward jump, or simply feeling like you can’t get under the bar. Instead, let the arms bend and pull the elbows high AFTER the legs have launched the bar upwards. This will keep the bar close AND actually helps you get under the bar faster.
Give these a try next time you’re at the gym! Stick with an empty bar or even a light technique bar first to get the movement down before adding more weight. Remember, If you want to learn the Olympic lifts, check out my FREE WL101: Beginner Guide + 6-Week Program. It’s got tons of demo videos, tutorials, and pictures to help you learn the snatch and clean and jerk, as well as a 6-week program with a built-in progression to help you get strong, even if you’ve never even touched a barbell before!